Showing posts with label Decorating. Show all posts

Thursday, May 21, 2009

Show Us Where You Live Friday - Dining Rooms


I have so enjoyed Kelly's bloggy home tour carnival. Thanks Kelly for allowing me to participate. What fun!

This week is Dining Rooms but I'm also throwing in my Foyer since it's nearby and was turning up in a couple of the photos anyway.

A view looking in from the foyer:
(This was my Nana's Dining Room Suite and I am so proud to have it. To be honest, there was a time when I didn't feel the same way; it's beautiful but wasn't what I would've chosen. Now though, I treasure it and have made it a little more "me" by adding the oversized chairs and removing the shelf from the hutch-turned buffet.)


From the foyer / to the right:


A very favorite thing....a handpainted (not by me) ceiling medallion:

From the kitchen area entrance:


A wider view from the foyer into the Dining Room:


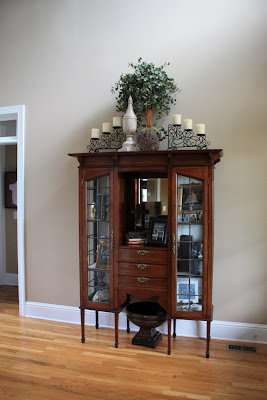
One of my only antiques. My Dad spent many years working for a company that did REconstruction (for homes with fire, water damage, etc.). He once was working for a lady with MANY interesting pieces and, one day, when Dad complimented this piece, she remarked that she had acquired it from a lady who owed her $100.00 for a wallpapering job that she couldn't collect on. Dad offered, "If you ever want your $100.00, I'll pay up for her and take this off your hands". She immediately took him up on it. It has the original leaded glass and beautiful inlay.


A fun little "pretty" (what my Grandma used to call decorative "things") by the front door:

The interior of the front doors:


A little spot to the right of the Dining Room:


Come Back Soon !!!

Friday, May 15, 2009

Show Us Where You Live Friday - The Guest Room

Ah...the Guest Room...a room, for me, that seems to get left behind. Often, our Guest Room has been filled with all of the stuff that didn't get used somewhere else. I did, however, recently (well, in the last two years) buy new bedding for that room and kind of cleansed it from some old had-beens, bringing in just a few accessories from other areas of the house.

Thanks for visiting!

This is a view from the doorway into the room:


And proof #1 that this room gets ignored...the window treatments that need to be hung...they've been right there for at least a year:

The trunk at the foot of the bed was my NaNa's hope chest.

When we bought this house, because the Guest Room was on the first floor and would be easily accessible for her, I always thought of this as NaNa's room. She never actually lived here but I still see it as "her room" and keep her picture there. She loved "little fat birds" so I keep this pair of concrete ones there.
There's that bare window:

The right hand side of the bed.
The left hand side of the bed.

The mirror (proof #2)....

That needs to be hung on the wall....

Posted by PicasaAnd, last but not least, a few shots of the adjoining bath.


Posted by Picasa


Saturday, May 9, 2009

Show Us Where You Live Friday....on Saturday

Yesterday was a crazy day so I'm a day behind but I love Kelly's new Friday feature and didn't want to miss out. Last week, we did kitchens (and as you can see, I haven't posted anything since....bad blogger) and today (or technically yesterday) is Living Rooms. I had posted my Living Room once before and intended to take some new pictures but didn't get around to it. For the most part, everything is still the same though I have shifted and changed out a few accessories (oh, and the laptop is not still in the floor) but details schmetails.....

This is the view coming in from the foyer. The blue piece of furniture on the right is actually intended for a buffet. I love it! It is large and giving me some great storage.


Next is the mantle and the really high windows that flank it (there is also another window directly above the fireplace - up high - that you can't see). Someday I want window treatments for there but, for now, it's on the to-do list. I posted my Great Room on Rate My Space one time and had a lot of comments about getting rid of the iron piece that is propped on the mantle. As you can see, I didn't take that advice. I love the piece as I needed something tall there which is hard to find (at a decent price) and this was $25.00 at a Yard Sale (I did add the finials).

A close-up of one of the arrangements on the mantle. I love these (Rate My Spacer's didn't love these either). I had them done on top of some candlesticks that I already had and I bought the pheasant pelts on Ebay...you wouldn't believe how much razzing I have taken for that.

This is a view across the room into the kitchen. I like this little cluster of mirrors but when I look at this picture, they look too low. I'll have to check that out a little further. My wall color also looks pinkish in these pictures and it's not. Must be all the sunlight coming in.

I really like this rounded sofa although it's not too comfortable to lay on.

...and I'm sneaking in a picture of my boys just because it's Mother's Day weekend and I can.


Last but not least, these are some examples of the type of panels I'd like to eventually do in this room. I like the hardware for the first ones and the fact that they don't cover up the shape of the window. They're just wide enough without being too overcoming. The second one I wondered if they could be done by buying already made panels and sewing them end to end. The ceiling heighth in this room is 20 feet and that's a lot o' fabric. Just an idea....what do you think?

Friday, May 1, 2009

Show Us Where You Live Friday

I love, love, love looking at other peoples' homes so, naturally, one of my favorite bloggy things to do is seeing pictures of other peoples' rooms and their decorating styles. I was so excited when one of my favorite bloggers mentioned doing some room tours and today is the day that it begins. Kelly will be hosting a weekly ("Show Us Where You Live Friday") special and I can hardly wait to see all the participants' entries. Today is kitchens, so here's mine.....

This is a view from the kitchen into the Breakfast Room. That's a jar of birdseed by the back door. I love to feed God's little birds and found this large jar at Dollar General which works nicely for storing their goodies.
Another angle into the Breakfast Room. I have a hard time with art pieces; just don't find very many that I love (and if I don't LOVE it, I don't need it) but this one, I love...
From the Breakfast Room in...the right side of the kitchen.
Posted by Picasa
And from the Breakfast Room in on the other side.
If you've been around my blog (or my world) long, you know that I have a thing about the way that my house smells. I love this scent (Sage & Citrus) by Yankee. It's looking like it might be about time for a replacement.
Kelly had a shot on her blog of similar canisters to these. I bought these cheap, cheap, cheap at Stein Mart because their friend (the middle-sized one) had been broken. I like them a lot.
And this, my friends, is the countdown to what's baking in there right now......
Lemon Squares....Yum!
(Don't worry, they're not for me...for a bake sale but I thought I'd share that I'm actually baking something just the same. It doesn't happen often, you know.)
Posted by Picasa

Friday, December 5, 2008

A Sweet Nursery for a Sweet Girl


I meant to post this a while back but somehow never got around to it. Today, as I ran across the pictures that I'd taken, I thought I'd go ahead and share.

As you know, I have a new niece...Sadie Katherine....who, by the way, has already turned out to be quite the drama queen, having spent 6 days in the hospital after she was born (with jaundice) and just returned home yesterday after having spent 3 more days at Vanderbilt with a fever.

Anyway, I wanted to help Ashley with a cute nursery for her new baby girl and these are a couple of the things that I came up with.

I started with these supplies (and a couple of other canvas' not pictured here) and some inspiration from the cute ladybug bedding (pillow shown) :


Gave them all a good base coat of paint (this pretty green for the little ones and white on the larger one (not shown in this pic):


Then I added black borders (again..to the smaller ones..for some reason, I didn't get pics along the way of the larger one but the finished product is shown below):


And then come the ladybugs:

Now, for some reason (perhaps when I panicked that I had NO IDEA what I was doing), I stopped taking pictures of my progress; however, I do have pictures from the nursery once they were hung...


We also made the letters at the top of this post. They are made of a cardboard-like material and can be purchased at Michael's. I was so excited to find the ladybug-esque scrapbook paper to cover them, then hung them from black cuphooks with the coordinating black and white gingham ribbon.